How to Install a Retaining Wall: Step-by-Step Guide

Retaining walls are more than just functional structures. They help control soil erosion, prevent flooding, and add style to your outdoor space. Many homeowners use them to level sloped yards, create garden beds, or add a decorative touch.
If you’re new to retaining wall installation, the process may seem overwhelming. But with the right tools, planning, and a little patience, you can do it step by step. This guide will walk you through everything you need to know, from planning to finishing touches.
Why Choose a Retaining Wall?
Before diving into the steps, let’s talk about why retaining walls are useful.
They hold back soil and keep your yard safe from erosion. If you have a sloped yard, a wall helps create flat, usable space. They can also act as a border for flower beds or a seating wall around a patio.
Another benefit is curb appeal. A well-built retaining wall can make your home look more polished and inviting.
Plan Your Wall
Every successful project starts with a plan.
First, figure out why you need the wall. Is it for holding back soil, or just for decoration? Your purpose will decide the size, shape, and materials.
Next, check local rules. Some areas require permits for walls above a certain height. You don’t want to build and later find out you need to take it down.
Finally, measure the space carefully. Draw out the design on paper. Decide on the length, height, and curve if any.
Choose the Right Material
When it comes to retaining wall installation, the material matters.
Here are a few popular options:
- Concrete blocks: Strong, uniform, and easy to stack.
- Natural stone: Offers a classic, rustic look.
- Bricks: Great for small garden walls.
- Timber: Affordable and natural, but may not last as long.
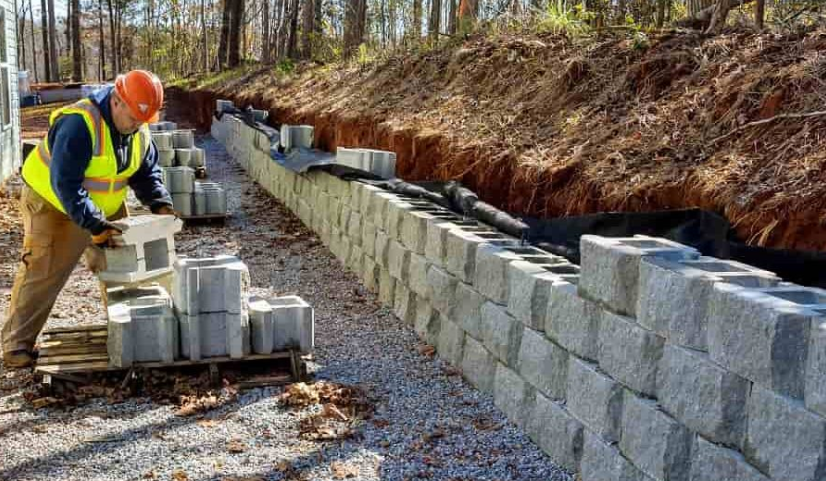
Concrete blocks are the most common choice for beginners. They’re heavy enough to stay in place and designed to fit together easily.
Gather Tools and Supplies
Having the right tools makes the job easier. Here’s a list of basics you’ll need:
- Shovel and wheelbarrow
- Tape measure and string line
- Level
- Tamper or plate compactor
- Gravel and sand
- Landscape fabric
- Drainage pipe (optional but recommended)
- Gloves and safety glasses
Make sure to get everything before starting. Nothing slows down progress like running back to the store mid-project.
Dig the Trench
The foundation is the most important part of any wall.
Mark out the wall with stakes and string. Then dig a trench along the line. The trench should be wide enough for your first row of blocks and deep enough to hold gravel plus part of the first block.
A general rule: bury the first row of blocks about one-tenth of the wall’s height. For example, if your wall is three feet tall, bury the first row about four inches.
Build a Solid Base
A wall is only as strong as its base.
Pour about four to six inches of gravel into the trench. Use a tamper or plate compactor to press it down until it’s firm and level.
Spread a thin layer of sand over the gravel to help adjust the first row of blocks. Use a level to check the surface carefully. If the base isn’t level, the whole wall will be off.
Lay the First Row
Now the fun begins—placing your first row of blocks.
Start at the lowest point of your trench. Place the first block carefully and check that it’s level front to back and side to side. Adjust with sand if needed.
Continue laying blocks, tapping each one into place with a rubber mallet. Keep checking with a level as you go. This row is the most important, so take your time.
Stack Additional Rows
Once the first row is perfect, the rest will go smoothly.
For the second row, stagger the blocks like bricks so the seams don’t line up. This adds strength and stability.
Some blocks come with lips or grooves that lock into place. If yours don’t, you can use landscape adhesive between layers.
As you build higher, step back often to make sure the wall looks straight and even.
Add Drainage
Water is one of the biggest threats to retaining walls. Without drainage, pressure builds up behind the wall and can cause it to crack or lean.
To prevent this, place a drainage pipe behind the first row of blocks. Cover it with gravel. This allows water to flow away instead of building pressure.
You can also lay landscape fabric between the soil and gravel to keep dirt from clogging the pipe.
Backfill as You Go
After every row, backfill behind the wall with gravel. This supports the blocks and improves drainage.
Compact the gravel with a tamper before moving to the next row. Add soil behind the gravel only after the wall is complete.
Don’t rush this step. Proper backfilling is key to a long-lasting wall.
Finish the Top
When the wall reaches the desired height, it’s time to cap it.
Capstones give the wall a clean, finished look. Use adhesive to secure them in place.
Once the caps are set, fill in the soil behind the wall. Plant grass, flowers, or shrubs to blend the wall into your yard.
Maintenance Tips
A retaining wall doesn’t need much upkeep, but a little care goes a long way.
Check the wall once or twice a year for leaning or loose blocks. Keep drains clear so water can flow freely. Trim back plants that might push against the wall.
With good maintenance, your wall can last for decades.
Final Thoughts
Building a retaining wall may seem like a big task, but breaking it into steps makes it manageable. From planning and digging to stacking and finishing, each step builds on the last.
Whether you’re adding function or style to your yard, retaining wall installation is a project worth the effort. The result is a strong, attractive wall that adds value to your property.
FAQs About Retaining Wall Installation
Q: How long does a retaining wall last?
A: A well-built retaining wall can last 20–50 years, depending on the material and maintenance.
Q: Do I need a permit for retaining wall installation?
A: It depends on your local rules. Small garden walls usually don’t, but taller walls often require approval.
Q:What is the best material for beginners?
A: Concrete blocks are the easiest for DIY projects because they’re uniform and easy to stack.
Q: How tall can I build a retaining wall myself?
A: Most experts recommend DIY walls under four feet. Taller walls need engineering and professional help.
Q: Can plants damage a retaining wall?
A: Large roots can push against the wall over time. Choose smaller plants or ground covers near the base.


